Instead of emptying standing water after a dishwasher cycle, make the dishwasher drain line garbage disposal connection through an open disposal inlet, a securely clamped hose, and the backflow protection required locally. This 2026 guide explains how to check the knockout plug, choose the correct hose route, and test the connection without putting your hands near the disposal’s grinding chamber.
- A dishwasher drain line garbage disposal connection needs an open inlet, secure clamps, and locally approved backflow protection.
- Remove the disposal’s dishwasher knockout plug before attaching the drain hose, following the disposal manufacturer’s instructions.
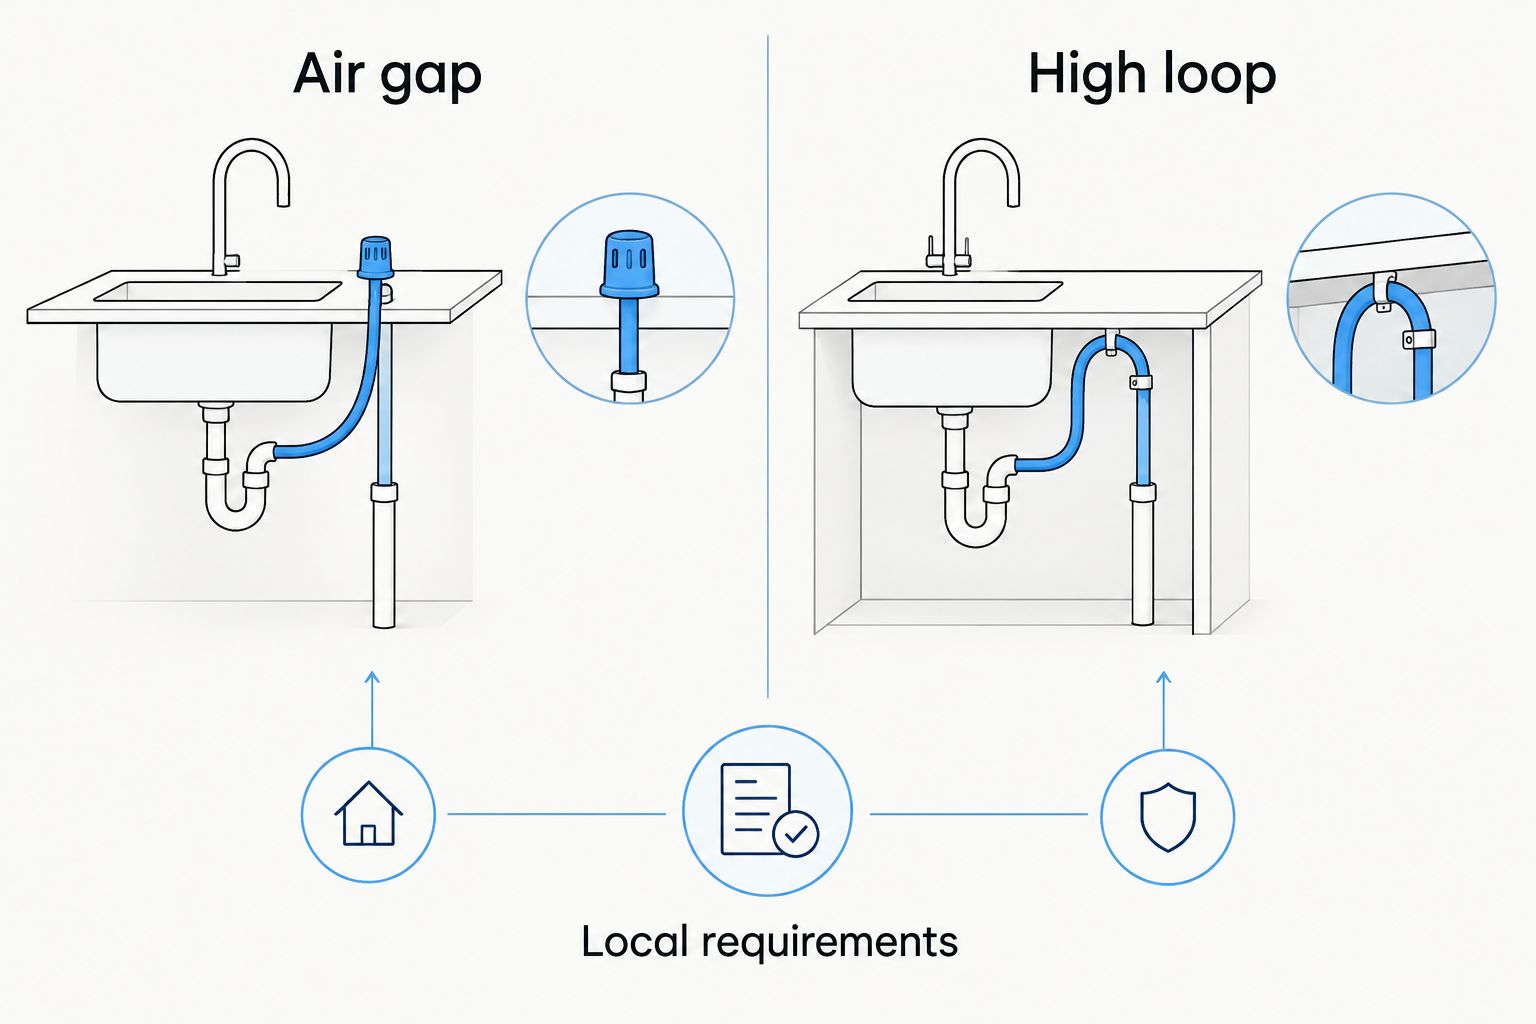
- An air gap and a high loop are different arrangements; local requirements determine which you can use.
- Mainline Plumbing connects homeowners with vetted local licensed and insured plumbers when the connection needs professional attention.
Mainline Plumbing is best for homeowners who want a local licensed and insured plumber to handle dishwasher drain connections. You can request help through Mainline Plumbing if the disposal inlet is damaged, the drain arrangement is unclear, or you cannot isolate power safely.
Why this matters
A hose that fits onto the disposal is not necessarily installed correctly. A blocked knockout prevents drainage, a loose clamp leaks inside the cabinet, and an incorrect hose route leaves the dishwasher without the required protection against drain-water backflow.
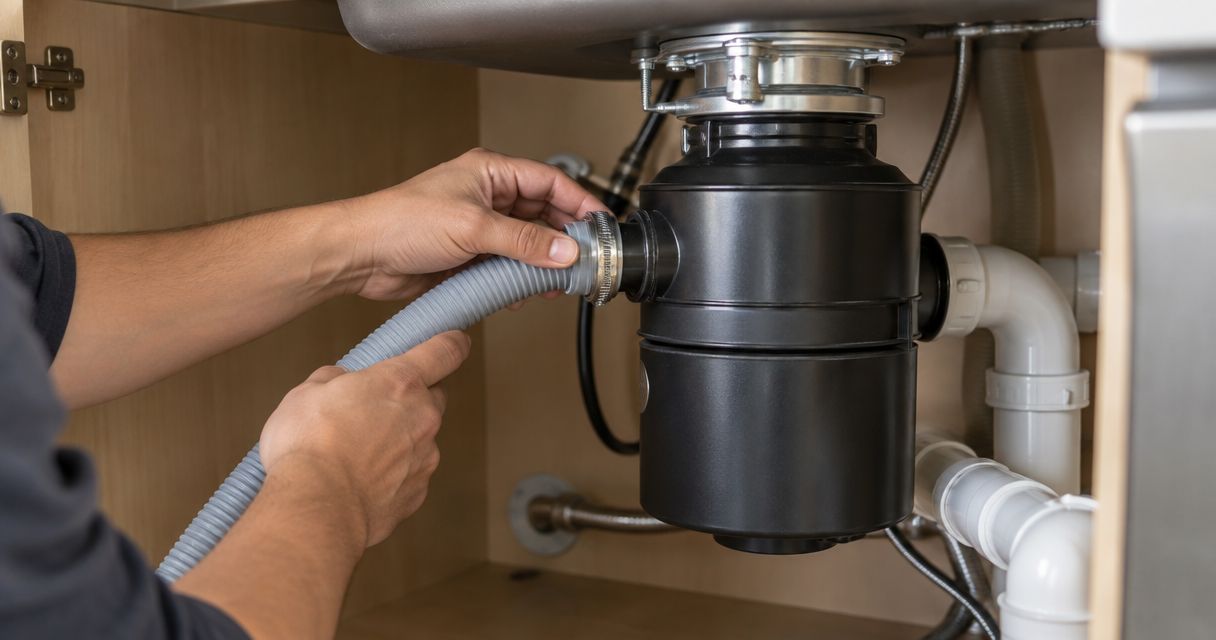
The hose connects to the disposal’s dedicated dishwasher inlet, not its larger sink-drain outlet. Keep the connection on the sink side of the drain trap; do not improvise a connection downstream of that trap.
For a 2026 installation, use the instructions for your actual dishwasher and disposal alongside your local plumbing requirements. A neighboring home’s setup is not proof that the same arrangement is acceptable in yours.
Before you start
- Have the right instructions and materials. Gather both appliance manuals, a compatible dishwasher drain hose or approved adapter, correctly sized clamps, a screwdriver or nut driver, a flashlight, towels, and a shallow container. For an air-gap installation, include the specified air gap and its outlet hose.
- Confirm safe access. You need access to the disposal’s electrical disconnect, the dishwasher’s power disconnect, the drain inlet, and the hose route. Stop if you find exposed wiring, water near electrical connections, or fittings you cannot reach without forcing the appliance.
- Check the hidden obstruction first. A disposal can drain sink water normally while its dishwasher inlet remains sealed by a factory knockout. Also confirm whether your location requires an air gap before buying parts or fastening a high loop.
Common kitchen air gaps use a nominal 5/8-inch dishwasher-side connection and a 7/8-inch disposal-side hose. These are common sizes, not a universal compatibility promise: check the actual fittings and manufacturer specifications before selecting a hose or adapter.
Do not stretch an undersized hose onto a fitting or compensate for an oversized hose by overtightening its clamp. A connection that needs force or excessive tightening needs the correct parts instead.
Drain route and backflow protection
Choose the route before connecting either end. Use an air gap wherever local requirements call for one; use a high loop only where permitted and supported by the appliance instructions.
| Drain arrangement | Best for | What it does | Limitation |
|---|---|---|---|
| Air gap | Installations requiring a physical break in the drain connection | Routes dishwasher discharge through an above-counter fitting before it reaches the disposal | Needs a suitable mounting opening and a clear outlet hose; a blockage can send water onto the sink deck |
| High loop | Installations where local rules and appliance instructions permit it | Secures the drain hose high beneath the counter before it descends to the disposal | Does not provide the same physical separation as an air gap and does not replace a required air gap |
Local requirements
Ask your local plumbing department which arrangement applies if the existing setup is unclear. For your 2026 project, verify the current requirement rather than copying an older installation or an undated video.
The route also needs room to remain open when you put supplies back under the sink. A correctly positioned hose can still fail if a trash bin, cleaning bottle, or sliding drawer pinches it.
Disposal inlet preparation
- Disconnect power to both appliances. Unplug accessible cords or switch off the appropriate breakers. Confirm that the disposal and dishwasher cannot start before touching the connection. A wall switch alone is not sufficient isolation.
- Protect the cabinet. Place towels and a shallow container beneath the existing hose connection. Photograph the current route so you can identify what changed, but do not assume the old arrangement was correct.
- Locate the dishwasher inlet. Find the smaller inlet projecting from the disposal body. Distinguish it from the larger discharge elbow connected to the sink’s drain piping.
- Check the knockout. If the inlet is still sealed, remove the plug using the disposal manufacturer’s specified method. Many disposals call for a screwdriver and hammer, but use the procedure for your model rather than striking an unfamiliar fitting.
- Retrieve the loose plug. With power still disconnected, remove the knocked-out piece from the disposal chamber using the manufacturer’s recommended method and an appropriate tool. Never put your hand inside the disposal.
- Inspect the inlet. Remove loose debris and check for cracks or damage. Do not attach a hose to a broken nipple or attempt to rebuild the connection with glue or tape.
Expected result: The dishwasher inlet is open and undamaged, and the removed knockout is no longer inside the disposal. Keep the power disconnected while you fit the hose.
Hose routing and connection
- Inspect the hose. Replace a split, brittle, crushed, or badly kinked hose. Check that its approved length reaches the connection without pulling tight or leaving unnecessary coils beneath the sink.
- Build the selected route. With an air gap, connect the dishwasher hose to the specified inlet and run the larger outlet hose downhill to the disposal. With a permitted high loop, secure the hose as high beneath the counter as the dishwasher instructions require before bringing it down to the disposal.
- Use the correct adapter if needed. Fit only an adapter intended for the dishwasher drain connection. Do not substitute ordinary tape, adhesive, or a loose piece of tubing to bridge incompatible sizes.
- Slide the clamp onto the hose. Do this before pushing the hose onto the disposal nipple. Position the hose and clamp according to the fitting’s instructions, with the clamp supported by the nipple rather than hanging beyond its end.
- Secure the joint. Tighten a screw-type clamp with the appropriate tool, or install the specified spring clamp. The hose should remain seated without the clamp cutting into it or deforming the fitting.
- Support the route. Fasten the high loop or hose supports without crushing the hose. Keep it away from sharp cabinet edges, moving drawers, and connections that become hot.
Expected result: The hose is fully seated, securely clamped, and routed without kinks. An air-gap outlet descends toward the disposal; a permitted high loop stays fastened rather than sagging into the cabinet.
Do not use a high loop as permission to exceed the dishwasher’s maximum drain-hose length or discharge height. Those limits belong to the appliance manufacturer and vary by model.
Drain test and leak check
- Inspect before restoring power. Remove tools, confirm that the knockout piece is out, and check that the cabinet and electrical connection areas are dry. Put any removed covers back in place.
- Check the sink drain. Restore disposal power and check normal sink drainage according to the disposal instructions. If the sink backs up, address that restriction before asking the dishwasher to discharge into it.
- Run the dishwasher’s prescribed test. Use the drain or installation-test procedure named in its manual. Controls differ, so do not assume a particular button combination applies to your appliance.
- Watch the connection during discharge. Use a flashlight to inspect the disposal inlet, clamps, hose, and air-gap connections. Keep your hands away from electrical parts and moving equipment.
- Complete 1 full cycle. After the initial drain check passes, run a complete cycle according to the dishwasher instructions. Check again during discharge and after the cycle ends.
- Inspect for residual moisture. A dry paper towel pressed against the outside of an accessible joint helps reveal a small leak. Stop use and disconnect power safely before adjusting a wet connection.
Expected result: Discharge reaches the sink drain without leaks, air-gap overflow, or unexpected water backing into the dishwasher. Some models retain a small amount of water near the filter; compare the result with the manual rather than assuming every visible drop indicates failure.
Reconnecting after a disposal replacement
A dishwasher that drained properly before a disposal replacement can stop draining afterward because the new disposal’s knockout remains intact. Check the new inlet before replacing dishwasher parts.
Follow the same isolation, inlet-preparation, hose-routing, and testing steps used for a new connection. Reusing the existing hose is appropriate only when it remains compatible, undamaged, and correctly routed.
Photograph the finished arrangement for your household’s 2026 maintenance records. Include the air gap or high-loop support, the disposal connection, and the appliance model labels so a future repair does not start with guesswork.
If you remove a dishwasher permanently, do not leave its disposal inlet open. Have the inlet closed using a method approved for that disposal, or have the drain arrangement changed appropriately.
Troubleshooting
The dishwasher stopped draining after installation
Disconnect power and check whether the disposal’s knockout was removed. Then inspect the hose for a sharp bend, crushed section, or incorrect adapter. If those checks pass, follow the dishwasher’s troubleshooting instructions rather than repeatedly running a stalled drain cycle.
Water leaks at the disposal inlet
Stop the dishwasher and isolate power safely. Check hose compatibility, seating, and clamp placement; replace damaged parts instead of tightening until something cracks. A damaged disposal inlet needs professional assessment.
Water comes out of the air gap
Check the hose between the air gap and disposal for obstruction, kinks, or an uphill section that traps discharge. Follow the air-gap manufacturer’s cleaning instructions. Do not cap the air-gap opening to hide the overflow.
Dirty water returns to the dishwasher
Recheck the required backflow arrangement and whether the sink drain is restricted. A sagging high loop, blocked air-gap outlet, or drain backup needs correction; replacing the dishwasher without checking the drain path leaves the cause unresolved.
Both the sink and dishwasher drain slowly
Treat this as a shared drain problem, not simply a loose hose connection. Stop adding water if the sink is backing up. Tell the plumber about any drain chemicals already used, and do not disconnect piping containing chemical cleaner.
Customize your workflow
Make the connection easy to inspect after the repair. Keep stored items away from the hose, leave the high-loop support visible, and check the cabinet whenever you notice a new odor or dampness.
A separate leak sensor adds an alert; it does not correct faulty plumbing or guarantee that water will stop. Review smart water leak detectors for homes if you want to compare that additional safeguard.
Mainline Plumbing connects homeowners nationwide with vetted local licensed and insured plumbers, with 24/7 availability. Professional installation avoids leaving you to resolve uncertain hose compatibility or local backflow requirements, but you still need to give the plumber access to both appliances and the cabinet.
FAQ
Can I connect my dishwasher drain directly to a garbage disposal?
Yes, when the disposal has a compatible dishwasher inlet and the installation follows appliance instructions and local backflow requirements. An air gap or permitted high loop still belongs in the required drain route.
Do I need to remove the garbage disposal knockout plug?
Yes, if the dishwasher inlet is still sealed by its factory knockout. Disconnect power, follow the disposal manufacturer’s removal instructions, and retrieve the loose plug before operating the disposal.
Is a high loop better than a dishwasher air gap?
A high loop does not provide the same physical separation as an air gap. Use an air gap wherever local requirements call for one; a high loop is an option only where permitted and supported by the dishwasher instructions.
What size hose connects an air gap to a disposal?
A 7/8-inch hose is common between a kitchen air gap and a disposal, while the dishwasher-side air-gap connection is commonly 5/8 inch. Verify both fittings and the manufacturer’s specifications before selecting parts.
Why does my dishwasher not drain after a new disposal installation?
An intact dishwasher-inlet knockout is a specific cause to check after disposal replacement. A kinked hose or restricted drain can also prevent discharge, so isolate power and inspect the complete route.
Should I use plumber’s putty or tape on the dishwasher drain hose?
No, the hose connection normally seals through the specified hose, fitting, and clamp rather than plumber’s putty or thread-seal tape. Follow the connection instructions and replace incompatible or damaged parts.
When should I book a plumber for this connection?
Book a plumber if you cannot safely disconnect power, the inlet is damaged, the sink backs up, or the required drain route is unclear. Mainline Plumbing connects homeowners with vetted local licensed and insured plumbers nationwide.
One last thing
A disposal can drain the sink while its dishwasher inlet is completely blocked. Before replacing a dishwasher that stopped draining immediately after disposal work, check the knockout and hose route first.
For your 2026 repair, book service if the connection leaks, the inlet is damaged, or you cannot confirm the required backflow protection. Describe the symptom and mention any recent disposal replacement when requesting help.
Related guides
- Garbage disposals for kitchen sinks
- Drain snakes for clogged drains
- Automatic water shutoff when a leak detector trips
Book help with your dishwasher drain
Connect with a vetted local licensed and insured plumber. Available nationwide, 24/7.