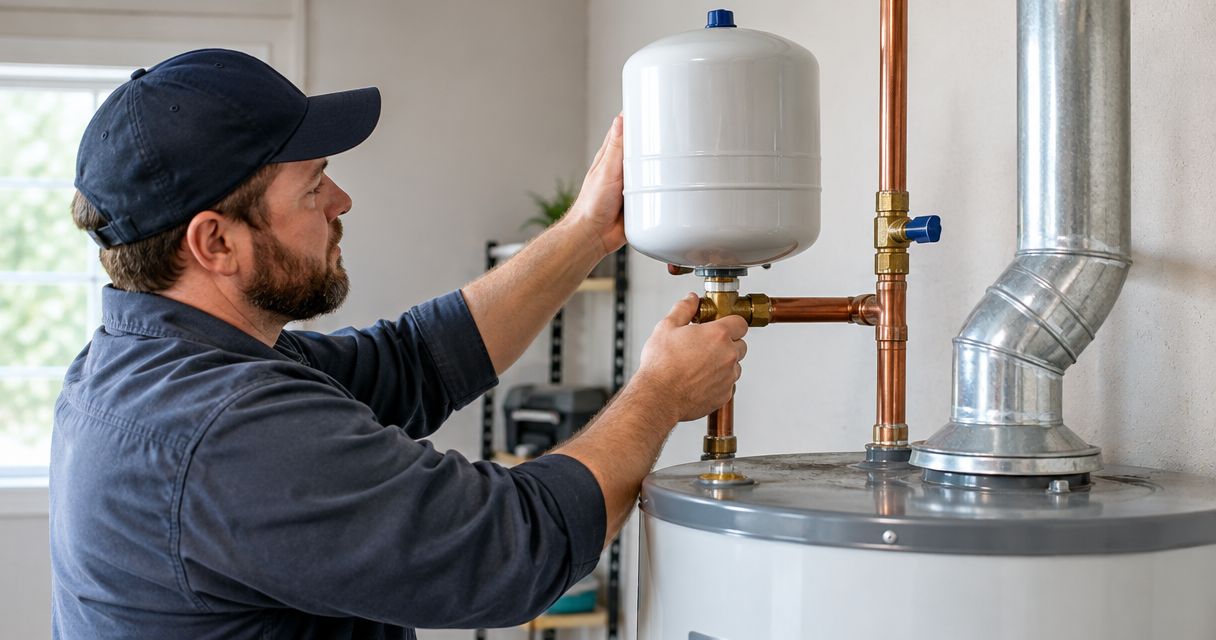
Instead of repeatedly draining water to control pressure after a heating cycle, connect a correctly sized expansion tank to the water heater’s cold-water supply so expanding water has somewhere to go. Safe water heater expansion tank installation requires matching the tank’s air charge to the home’s cold-water pressure, supporting its weight, and keeping it connected to the heater without an intervening closed valve.
- Water heater expansion tank installation belongs on the cold supply, following the tank manufacturer’s connection and support instructions.
- Match the expansion tank’s air charge to cold-water pressure with the tank’s water side unpressurized.
- An expansion tank controls thermal expansion; it does not replace a pressure-reducing valve or safety relief valve.
- Mainline Plumbing connects homeowners with vetted local licensed and insured plumbers for water heater service.
Why this matters
Water expands as it heats. When a check valve, backflow preventer, or pressure-reducing valve prevents that water from moving back toward the supply, pressure rises inside the closed plumbing system.
An expansion tank provides a compressible air cushion behind a diaphragm. It accepts expanding water without releasing drinking water through a drain or relief valve.
Mainline Plumbing is best for homeowners who want water heater service through a nationwide network of vetted local licensed and insured plumbers. You can book service through Mainline Plumbing rather than cut into a supply line yourself.
For a 2026 installation, confirm the local permit and inspection requirements before changing the piping. This guide explains a conventional storage-water-heater setup; the equipment instructions and locally adopted plumbing code determine the final arrangement.
Before you start
- Confirm the right equipment. Have the heater manual, a potable-water thermal expansion tank, its sizing instructions, compatible fittings, an approved support, a water-pressure gauge, and an air-pressure gauge. A heating-system expansion tank is not automatically suitable for drinking water.
- Confirm safe access. Locate the cold-water shutoff and the heater’s energy disconnect. Identify the temperature-and-pressure relief valve and leave its discharge piping untouched. Arrange licensed help if the work requires unfamiliar pipe joining, electrical work, or gas-system changes.
- Catch the pressure-setting trap. Adjust the expansion tank’s air charge before connecting it, or with its water side isolated and completely depressurized. A reading taken while household water pressure pushes against the diaphragm does not establish the correct precharge.
Stop if the existing piping is badly corroded, a shutoff will not close, or water is near electrical equipment. Repair those conditions before attempting the connection.
Supply pressure and tank sizing
Establish the pressure baseline
- Measure cold pressure. Attach a suitable water-pressure gauge to an appropriate connection on the same pressure zone as the heater. Close fixtures and stop water-using appliances so the reading represents static pressure, not pressure during flow.
- Check the pressure-control arrangement. Identify any pressure-reducing valve, check valve, or backflow device. Do not remove or bypass these devices to create a return path for expanding water.
- Address excessive supply pressure first. Widely adopted model plumbing codes use 80 psi as the threshold above which pressure reduction is required. Confirm the locally adopted rule; an expansion tank is not a substitute for correcting excessive incoming pressure.
- Size the tank from its manufacturer’s chart. Use the heater’s storage capacity, incoming pressure, operating temperature, and the chart’s stated assumptions. Do not select a tank solely because its connection fits the pipe.
Expected result: You have a recorded cold-water pressure and a tank selected for the actual system—not just the available space beside the heater.
A small-looking tank is not necessarily undersized, and a larger tank does not correct an incorrect air charge. Usable acceptance capacity depends on the tank’s construction and operating pressures. For a 2026 replacement, check the current sizing instructions rather than copying an old installation without verification.
Choose the connection arrangement
Use the cold-water connection arrangement shown in the equipment instructions. The expansion tank must remain in hydraulic communication with the heater when the heater operates; a closed valve between them defeats its purpose.
| Installation approach | Best for | Advantage | Limitation |
|---|---|---|---|
| New cold-supply branch | A heater without an existing expansion-tank connection | Allows deliberate placement and independent support | Requires modifying the supply piping and checking the full arrangement |
| Existing branch replacement | A failed tank on an otherwise suitable installation | Can preserve sound piping and support | Reusing the branch does not prove the old sizing or placement was correct |
Choose a new branch when the existing arrangement isolates the tank from the heater or cannot support it properly. Reuse a branch only after checking its condition, connection size, location, and support requirements.
Heater shutdown and tank preparation
Make the system safe
- Turn off the heat source. For an electric heater, switch off the appropriate breaker and verify safe isolation before working. For a gas heater, follow the manufacturer’s shutdown instructions. Do not alter gas piping for an expansion-tank installation.
- Let the water cool. Hot water and pressurized discharge can burn you. Do not treat the absence of a running burner as proof that stored water is cool.
- Close the appropriate cold-water shutoff. Open a suitable hot-water faucet to release pressure. Drain enough cooled water through an appropriate route to empty the section being opened.
- Verify depressurization. Confirm 0 psi on the water side before opening the piping. An open faucet alone is not proof that an isolated section has drained.
Expected result: The heater cannot heat, the work area is depressurized, and the pipe section can be opened without a pressurized release.
Keep the temperature-and-pressure relief valve connected and unobstructed throughout the work. Never plug it, cap its discharge, or use it as the expansion-tank connection.
Set the air charge
- Keep the tank’s water connection unpressurized. For a new tank, make this adjustment before installation. For a connected tank, follow its instructions for isolating and relieving water pressure.
- Measure the air charge. Use the air valve and a suitable gauge. Do not assume the factory setting matches your home.
- Adjust to the recorded cold static pressure. Add or release air as the tank manufacturer directs, without exceeding its limits. Recheck after adjustment and replace the air-valve cap.
Expected result: The air charge matches the intended cold-water pressure under the manufacturer’s specified measurement conditions.
Do not add air to a tank that leaks, shows serious corrosion, or releases water from its air valve. Those symptoms call for replacement or professional assessment, not a higher air charge.
Cold-supply connection and support
Install the branch and tank
- Locate the approved branch position. Use a tee on the cold-water supply in the arrangement specified by the heater and tank manufacturers. Preserve required safety devices, clearances, and access.
- Use compatible materials. Match fittings to the pipe material, connection method, temperature rating, and drinking-water application. Apply thread sealant only where the connection instructions require it; compression seals and gaskets do not work like tapered pipe threads.
- Protect the tank during pipe joining. Complete heat-producing work according to the fitting and tank instructions. Do not expose the tank’s diaphragm or nearby plastic components to joining heat.
- Install independent support. Use a bracket, strap, or mounting system approved for the tank’s permitted orientation. Plan for a tank that becomes waterlogged, not merely its empty weight.
- Connect without pipe strain. Align the branch and tank before tightening. Do not pull misaligned piping into position with the threaded connection or use the tank body as a wrench.
Expected result: The tank is securely mounted, the piping is unstressed, and no operating valve can separate the expansion tank from the heater during normal heating.
The installation sequence is simple; skipping its pressure and support checks is what creates trouble. Keep the sequence visible while checking the completed work.
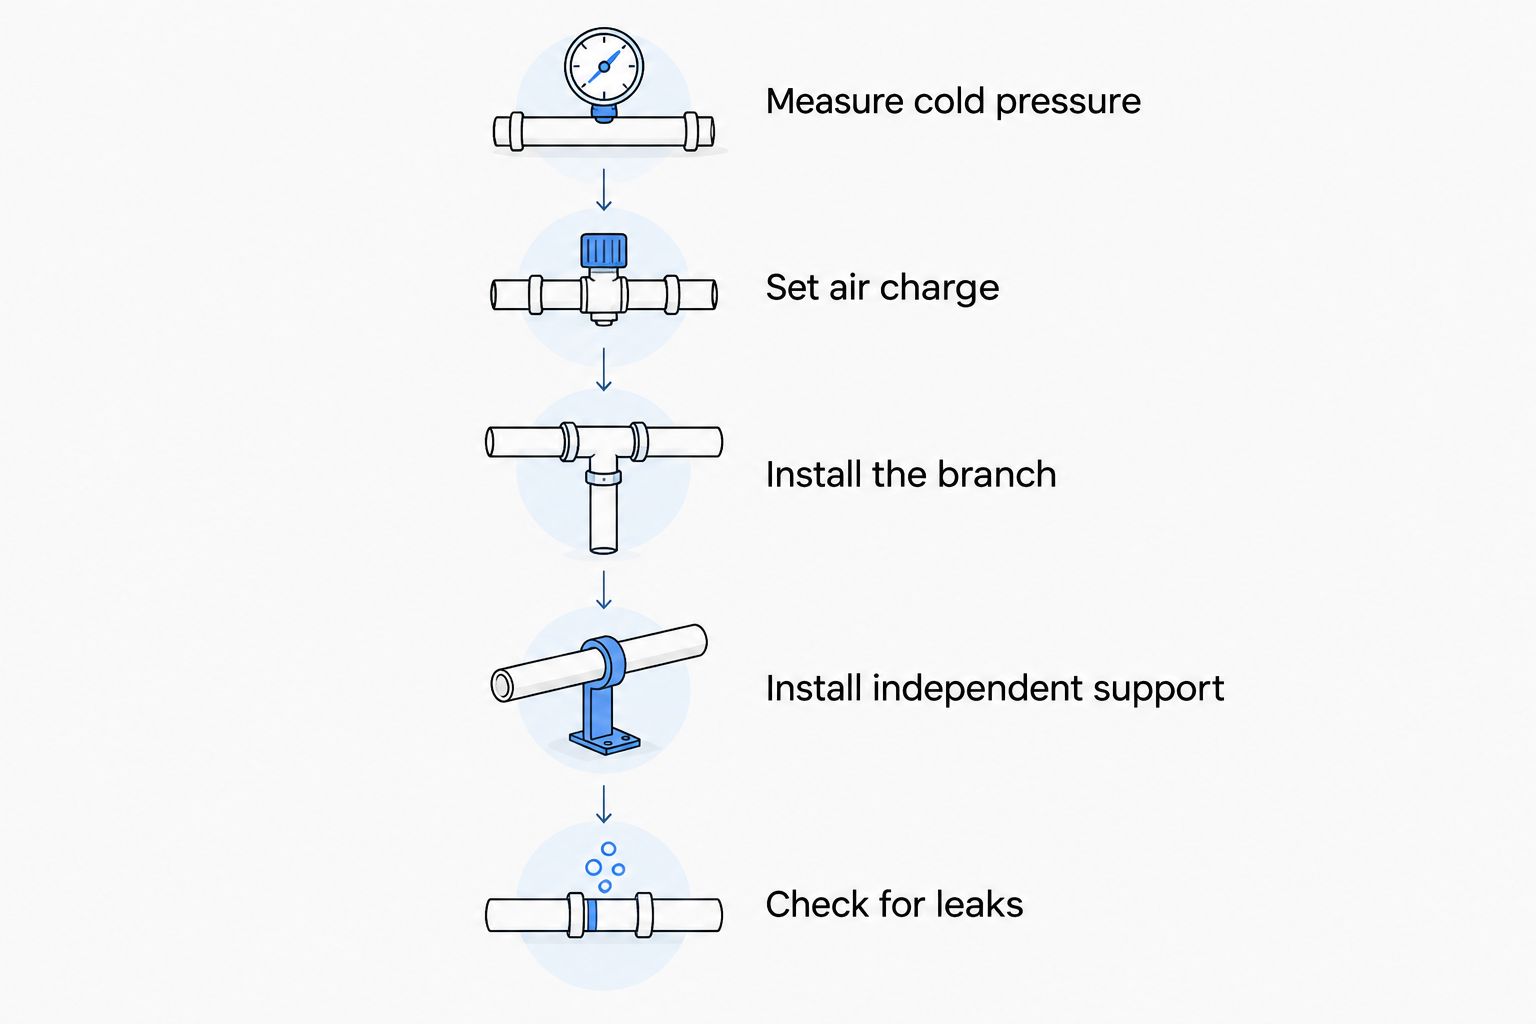
Do not assume every expansion tank permits horizontal mounting. Orientation and support requirements vary by model. If the available space requires an arrangement the instructions do not allow, change the location or select suitable equipment.
In freezing locations, placement also matters. The expansion tanks guide for cold-climate homeowners covers that planning issue; insulation alone does not make an unheated location safe from freezing.
Refill and operating checks
Restore water before heat
- Check the assembly. Confirm the drain is closed, required valves are in their operating positions, and the tank support is secure.
- Open the water supply slowly. Keep a suitable hot-water faucet open to release trapped air. Follow the heater’s filling instructions and wait for a steady stream before closing the faucet.
- Check for leaks. Inspect the tee, tank connection, disturbed fittings, and nearby piping with the system under cold static pressure. Correct leaks before restoring heat.
- Restore the heat source. Follow the heater’s startup instructions. Never energize an electric storage heater before confirming it is full of water.
- Observe a complete heating cycle. Check the pressure trend, relief discharge, connections, and support as the heater returns to its normal setting. Shut down and investigate persistent leakage or abnormal pressure.
Expected result: The heater fills normally, the connections remain dry, and thermal expansion is accommodated without a continuing abnormal pressure rise.
For a 2026 service record, write down the tank model, measured cold pressure, air-charge setting, installation date, and any valve changes. These details make the next inspection more useful than a note that simply says the tank was replaced.
Replacing an existing expansion tank
Replacement follows the same shutdown, depressurization, precharge, and refill sequence as a new installation. The difference is that the branch already exists; it still needs inspection.
Support the old tank before loosening its connection. A failed diaphragm can leave it substantially heavier than expected. Do not twist it off while allowing its weight to hang from a tee or flexible connector.
Inspect the branch and support for corrosion, distortion, or movement. Verify sizing against the current heater and supply pressure, especially if either has changed. A matching thread size is not proof that a replacement tank is suitable.
Mainline Plumbing offers access to local water heater service when replacement also requires correcting unsafe piping or support. The benefit is professional assessment of the whole arrangement; the limitation is that the required repair cannot be determined from the tank’s appearance alone.
Troubleshooting after installation
- The relief valve still drips. Check incoming pressure, tank sizing, air charge, and whether a valve isolates the tank. A damaged relief valve can also leak; never cap the outlet to stop it.
- Pressure rises sharply during heating. Confirm that the expansion tank communicates with the heater and that its diaphragm is functioning. Check precharge only under the manufacturer’s depressurized measurement conditions.
- A new threaded connection seeps. Turn off heat, isolate water, cool and depressurize the system, then inspect the fitting and seal. Do not keep tightening a pressurized connection or conceal leakage with external sealant.
- The tank or pipe moves. Stop using the installation until its support is corrected. The supply pipe should not carry an unsupported tank unless the manufacturer expressly permits that arrangement.
- Air comes from hot-water faucets after refill. Purge trapped air through a suitable fixture as directed by the heater instructions. If sputtering persists, check the fill and supply arrangement before restoring normal operation.
Customize your maintenance plan
For a 2026 maintenance plan, include the expansion tank whenever the water heater or pressure-reducing valve receives service. A changed supply-pressure setting can require a corresponding air-charge adjustment.
Keep access to the tank, air valve, shutoff, and support clear. Ask the servicing plumber to explain how to isolate your particular installation safely; valve arrangements are not identical from one home to another.
FAQ
Where does an expansion tank connect to a water heater?
A potable-water expansion tank normally connects to a branch on the heater’s cold-water supply. Follow the equipment instructions and local code, and keep the tank in hydraulic communication with the heater during operation.
Can I install a water heater expansion tank myself?
Only attempt the installation if local rules allow it and you can safely isolate, depressurize, join, support, and test the piping. Hire a licensed plumber when the shutoff fails, the piping is damaged, or the work exceeds your skills.
What pressure should I put in the expansion tank?
Set the air charge to the home’s measured cold static water pressure, following the tank manufacturer’s instructions. Make the adjustment with the tank’s water side unpressurized, not while household pressure is acting on the diaphragm.
Can a water heater expansion tank be installed horizontally?
Horizontal installation is acceptable only when the particular tank’s instructions permit it and its support requirements are met. Do not assume a different tank’s mounting arrangement applies.
Will an expansion tank fix high water pressure?
An expansion tank controls pressure increases caused by thermal expansion; it does not regulate excessive incoming supply pressure. A pressure-reducing valve and other repairs address different problems.
Does a tankless water heater need an expansion tank?
Check the tankless heater’s installation instructions and local code rather than assuming it needs the same arrangement as a storage heater. Recirculation, storage components, and the plumbing system’s design affect the requirement.
Why is water coming out of the expansion tank’s air valve?
Water from the air valve indicates a failed diaphragm and calls for tank replacement. Adding air does not repair the damaged separation between the water and air chambers.
One last thing
An expansion tank can look sound outside while its diaphragm has failed inside. Appearance alone is not a condition check, and a quiet relief valve does not prove that sizing, air charge, and support are correct.
Book water heater service through Mainline Plumbing if you cannot confirm those checks. Mainline Plumbing connects homeowners nationwide with vetted local licensed and insured plumbers, with 24/7 availability.
Related guides
- Expansion tanks for new homeowners
- Water heater expansion tanks compared
- Smart water leak detectors for homes
Book water heater service
Get connected with a vetted local licensed and insured plumber. Available 24/7 nationwide.